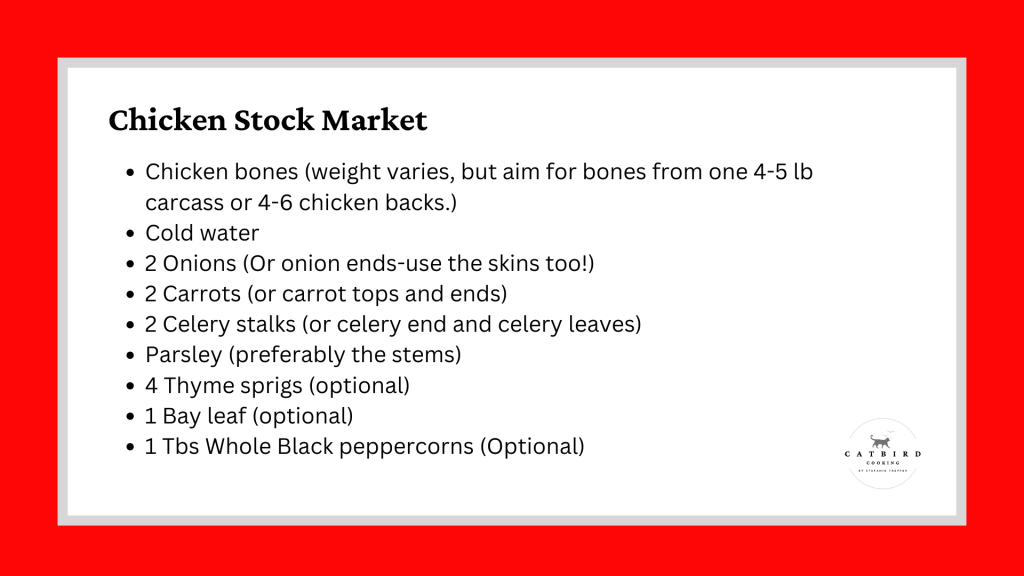
I make a lot of chicken! It’s probably the number one protein in our house because it satisfies even the pickiest eaters in my family. When I make it, I almost always fabricate the carcass myself. It’s economical and allows me to utilize parts of the chicken that may otherwise get thrown away. When I buy a whole chicken, I try to use everything. I have made crispy Chicharrón from the chicken skin, paté with the heart, gizzards, and liver, and of course, I use the bones. In fact, the bones are an altogether different story because they introduce a conversation about making stock.
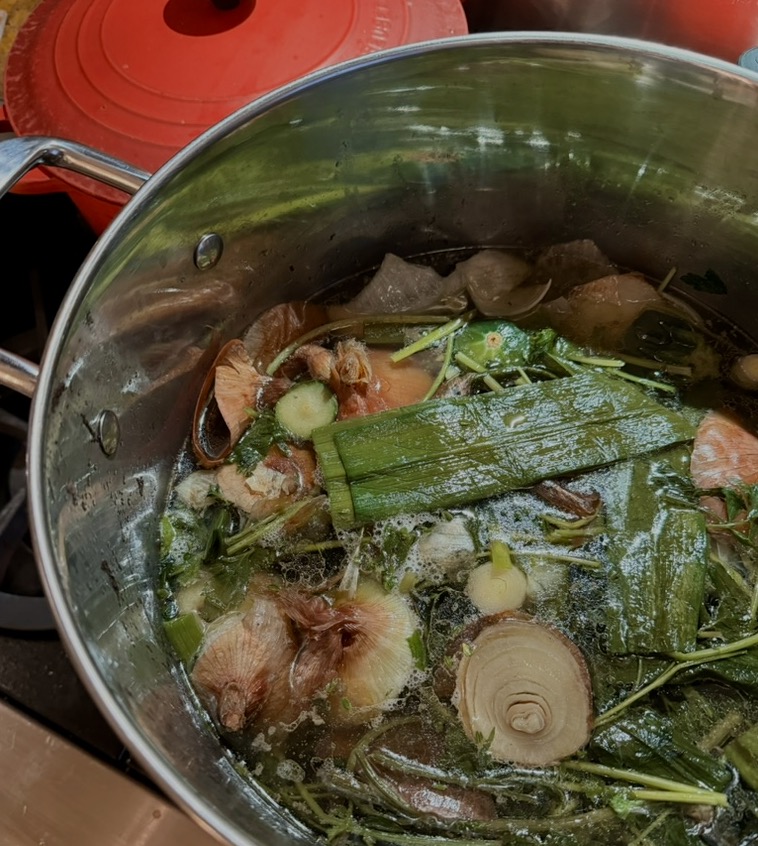
I know it’s easy to go to the store and pay for a box of stock or broth. But chicken broth, in particular, is really easy to make and will yield a lot more than the amount in a box or can you can buy. You can make chicken stock with either raw or cooked chicken bones and with or without vegetables. Obviously, the addition of veggies such as carrots, celery, and onions will add flavor, but if you’re in a pinch, they can be omitted. Don’t go out and buy new vegetables for stock. Stock is a vehicle for utilizing vegetable ends and those ‘sad’ vegetables in your crisper drawer that have seen better days.
Another benefit of making stock at home is that it freezes well. You can freeze it in larger batches or containers such as ice cube trays for smaller ones. If using the latter, once the stock is frozen, remove the cubes from the trays and place them in a freezer bag. Frozen homemade stock should last for around six months, which is why it is helpful to always label and date your stock.
Many people think that making stock is complicated, but in fact, it’s quite easy if you follow a few simple steps. The first and second steps work in tandem. Start your stock with cold water and the chicken bones, allow them to come up to a boil, and then immediately bring the water to a simmer. As you heat the water, impurities are drawn out of the bones and float to the top of the water. That leads to the last important step: always skim the impurities for about 30 minutes before adding your vegetables, should you choose to use them. Fun fact: keep the skins on your onions; they produce a beautiful, rich, brown color in your stock. You will see that the flavor of a homemade stock is unparalleled to one made in a factory. So, save your chicken scraps and get into the chicken stock market!
Procedure
Step 1: Trim chicken bones of excess fat if necessary. Save for another use.
Step 2: Cut the onion, carrot, and celery into large chunks. Ideally, the weight of mirepoix is ¼ the weight of the bones. Set aside.
Step 3: Combine the chicken bones and the cold water in a large stockpot.
Step 4: Bring the water to a boil and immediately reduce the heat to a simmer.
Step 5: Skim the impurities from the surface of the stock and continue to do so every few minutes until they dissipate. This should take about 30 minutes.
Step 6: Add the onion, carrot, celery, parsley, thyme, bay leaf, and peppercorns. Simmer the stock for 3-6 hours.
Step 7: Once time has been reached, immediately strain the stock through a sieve into a new pot.
Step 8: Place the pot with the stock into an ice bath to cool. DO NOT PUT HOT STOCK INTO THE REFRIGERATOR OR FREEZER! It can breed bacteria.
Step 9: Once the stock is fully cooled, place the stock in a food-safe vessel, label it with its name and date, and store it in the refrigerator or freezer.
Step 10: If your stock is placed into the refrigerator, chicken fat will rise to the top, and the stock will congeal. This is normal. It’s due to the extraction of collagen from the chicken bones. You can skim off the fat before you use the stock, but fat is flavor, so save it for another use.
